· tutorials · 9 min read
By AnvithWebhook Integration Testing: From Payload to Proxy
Learn how to use Beeceptor and the Artillery load testing tool to simulate, test, and debug complex webhook scenarios, including response manipulation, stateful storage, and payload forwarding.

Introduction to Webhook Testing
Webhooks are a crucial modern, event-driven communication method that enables communication without polling. However, testing them can be complicated. Challenges include setting up a reliable webhook receiver (sink), simulating failures, and managing state across multiple requests. This is where Beeceptor comes in, offering a suite of flexible and powerful features to test your webhook producers. We’ll use Artillery CLI to simulate a webhook sender from our local machine.
Setting Up the Stage
1. The Webhook Receiver (Sink)
First, you’ll need an HTTP endpoint to act as the webhook sink/receiver. We’ll use Beeceptor for this purpose.
For this article, we’ll use an example Beeceptor endpoint: https://free-endpoint-101.free.beeceptor.com
Note: You should substitute this example with your own Beeceptor endpoint.
2. The Webhook Sender (Source)
To simulate realistic webhook traffic, we’ll use Artillery, a load-testing tool.
Installation and Setup Create a source root for your Artillery configuration and install the necessary packages using npm:
npm install artillery artillery-plugin-fake-data @ngneat/falsoartillery: The CLI tool for load generation.artillery-plugin-fake-data: An Artillery plugin for using fake data in YAML.@ngneat/falso: A robust library to generate realistic, fake data for payloads.
3. Artillery Configuration Files
We’ll create two files: payload.yml (the Artillery config) and processor.js (the external fake data processor).
payload.yml (Artillery Configuration)
This file defines the target, variables, processor, and three distinct webhook scenarios: Stripe, E-commerce, and Email.
config:
  target: "[https://free-endpoint-101.free.beeceptor.com](https://free-endpoint-101.free.beeceptor.com)"
  # USE your beeceptor endpoint base URL as the value for ``config.target``!!!
  variables:
    count: 1
    delay: 0

  processor: "./processor.js"

  phases:
    - name: "Single VU for Fixed Request Count"
      arrivalCount: 1
      duration: 1

  plugins:
    fake-data: {}

scenarios:
  - name: "Stripe Payload"
    weight: 33
    flow:
      - loop:
          - function: "setStripePayloadVariables"
          - think: "{{ delay }}ms"
          - post:
              url: "/webhooks/stripe"
              headers:
                Content-Type: "application/json"
              json:
                type: 'stripe'
                event_id: "{{ $randUuid() }}"
                timestamp: "{{ $randPastDate() }}"
                payment:
                  amount: "{{ randomAmount }}"
                  currency: "{{ randomCurrency }}"
                  status: "{{ randomStatus }}"
                  customer_id: "{{ randomCustomerId }}"
        count: "{{ count }}"

  - name: "Ecomm Payload"
    weight: 33
    flow:
      - function: "setEcommPayloadVariables"
      - loop:
          - think: "{{ delay }}ms"
          - post:
              url: "/api/v1/orders"
              headers:
                Content-Type: "application/json"
              json:
                type: 'ecomm'
                event_id: "{{ $randUuid() }}"
                timestamp: "{{ $randPastDate() }}"
                order:
                  order_id: "{{ randomOrderId }}"
                  status: "{{ randomOrderStatus }}"
                  items_count: "{{ randomItemsCount }}"
                  total_price: "{{ randomTotalPrice }}"
                  delivery_address: "{{ randomDeliveryAddress }}"
        count: "{{ count }}"

  - name: "Email Payload"
    weight: 34
    flow:
      - function: "setEmailPayloadVariables"
      - loop:
          - think: "{{ delay }}ms"
          - post:
              url: "/webhooks/email-status"
              headers:
                Content-Type: "application/json"
              json:
                type: 'email'
                event_id: "{{ $randUuid() }}"
                timestamp: "{{ $randPastDate() }}"
                email:
                  recipient: "{{ randomRecipient }}"
                  event: "{{ randomEmailEvent }}"
                  campaign_id: "{{ randomCampaignId }}"
        count: "{{ count }}"
processor.js (External Fake Data Processing)
This JavaScript file uses @ngneat/falso to externally process complex, realistic data for artillery variables that cannot make use of the artillery-plugin-fake-data plugin inside the YAML (like concatenated strings or conditional values or values with additional falso attributes).
const {
  randNumber,
  rand,
  randAlphaNumeric,
  randEmail,
  randZipCode,
  randCurrencyCode
} = require('@ngneat/falso');

// --- Stripe Payload Processor ---
function setStripePayloadVariables(userContext, events, done) {
  // 1. AMOUNT (Numerical)
  const amountNumber = randNumber({ min: 1000, max: 50000, precision: 100 });
  userContext.vars.randomAmount = amountNumber.toString();

  // 2. STATUS (Element Selection)
  userContext.vars.randomStatus = rand(['succeeded', 'failed', 'pending']);

  // 3. CUSTOMER ID (Concatenated String)
  const randomChars = randAlphaNumeric({ length: 15 }).join('');
  userContext.vars.randomCustomerId = 'cus_' + randomChars;

  // 4. CURRENCY
  userContext.vars.randomCurrency = randCurrencyCode();

  return done();
}

// --- Ecomm Payload Processor (Needed for Scenario 2) ---
function setEcommPayloadVariables(userContext, events, done) {
  // 1. ORDER ID: Concatenated string
  const orderId = 'ORD-' + randNumber({ min: 1000000, max: 9999999 });
  userContext.vars.randomOrderId = orderId;

  // 2. STATUS: Element selection
  userContext.vars.randomOrderStatus = rand(['order_placed', 'processing', 'shipped', 'delivered']);

  // 3. ITEMS COUNT: Convert to string
  userContext.vars.randomItemsCount = randNumber({ min: 1, max: 5 }).toString();

  // 4. TOTAL PRICE: Convert to string
  const totalPrice = randNumber({ min: 20, max: 1000, precision: 1 });
  userContext.vars.randomTotalPrice = totalPrice.toString();

  // 5. DELIVERY ADDRESS
  userContext.vars.randomDeliveryAddress = randZipCode();

  return done();
}

// --- Email Payload Processor (Needed for Scenario 3) ---
function setEmailPayloadVariables(userContext, events, done) {
  // 1. RECIPIENT
  userContext.vars.randomRecipient = randEmail();

  // 2. EVENT: Element selection
  userContext.vars.randomEmailEvent = rand(['delivered', 'bounced', 'opened', 'clicked']);

  // 3. CAMPAIGN ID: Concatenated string
  const campaignId = 'CMP-' + randNumber({ min: 100, max: 999 });
  userContext.vars.randomCampaignId = campaignId;

  return done();
}

// --- CRITICAL: Export ALL functions used in payload.yml ---
module.exports = {
  setStripePayloadVariables,
  setEcommPayloadVariables,
  setEmailPayloadVariables
};
Understanding payload.yml and the process of random data generation
The Artillery configuration in payload.yml relies on two different mechanisms for generating realistic data:
artillery-plugin-fake-data: This plugin is configured under thepluginssection and allows for simple, out-of-the-box random data generation directly within the YAML using Nunjucks templating. For instance,{{ $randUuid() }}for a UUID or{{ $randPastDate() }}for a timestamp.processor.js(Custom Logic): For more complex or custom fake data generation—such as concatenated strings (cus_...), numerical values with specific precision, or values that rely on the actual@ngneat/falsolibrary’s functions—we use the externalprocessor.jsfile. Thepayload.ymluses thefunction:keyword (e.g.,"setStripePayloadVariables") to call these custom JavaScript functions before sending a request.
This combination ensures that every webhook payload sent during the simulation is unique and realistic. The config.target key in the YAML defines the webhook sink (your Beeceptor endpoint). The variables section defines two primary variables for controlling the test run: count (the number of requests per scenario) and delay (the pause in milliseconds between each request).
Running the Webhook Simulation
The command artillery is used to run the tests.
Default Command Structure
npx artillery run payload.yml --variables '{"count": 5, "delay": 1000}'payload.yml: The configuration file.--variables '{"count": 5, "delay": 1000}': Overrides the defaultcountanddelayvariables in the YAML file. This allows you to dynamically fine-tune the number of requests (count) and the delay between them (delay) without modifying thepayload.ymlitself.
By default, running the test without the --scenario-name argument will run all three defined scenarios (Stripe Payload, Ecomm Payload, Email Payload) based on their hardcoded weight (probability).
Running a Specific Scenario
To isolate one scenario for targeted testing (e.g., only running the E-commerce payload), use the --scenario-name argument:
npx artillery run payload.yml --variables '{"count": 5, "delay": 1000}' --scenario-name "Ecomm Payload"Advanced Webhook Testing with Beeceptor
Once the Artillery configuration is set, we can leverage Beeceptor’s features to perform advanced webhook testing.
1. Payload Discovery
Run a scenario to send traffic to your Beeceptor endpoint (e.g., the E-commerce payload):
npx artillery run payload.yml --variables '{"count": 5, "delay": 1000}' --scenario-name "Ecomm Payload"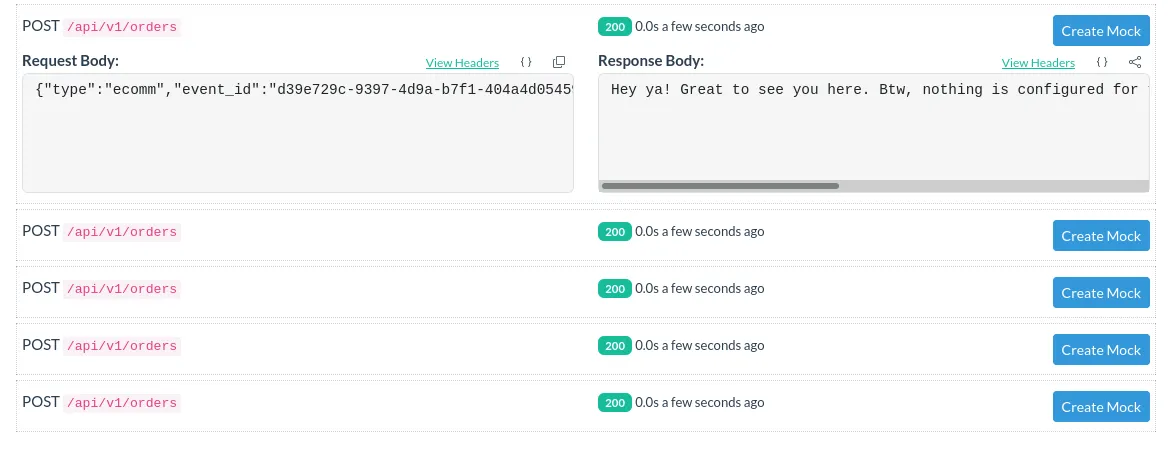
The Beeceptor dashboard will show the 5 incoming requests. You can inspect the requests to confirm the unique, randomly generated payloads using the fake data packages. This discovery helps you understand the exact data format being sent, enabling you to create accurate mock rules.
2. Payload Storing (State Management)
Beeceptor allows you to store stateful data from incoming webhooks. Let’s run the Stripe scenario:
npx artillery run payload.yml --variables '{"count": 2, "delay": 1000}' --scenario-name "Stripe Payload"To store the sum of the payment amounts, create a Beeceptor rule that matches the request path (/webhooks/stripe) and uses the step-counter helper:
{{ step-counter 'inc' 'totalAmount' (body 'payment.amount') ~}}
{
  "totalAmount" : {{ step-counter 'get' 'totalAmount' }}
}
Note: The tilde (~) before the end of the curly braces ( ”}}” ) in the first template statement is to get rid of extra whitespaces created by this hidden statement when this template is returned as a response.
Important: Ensure “Enable dynamic mock responses” is checked for this rule.
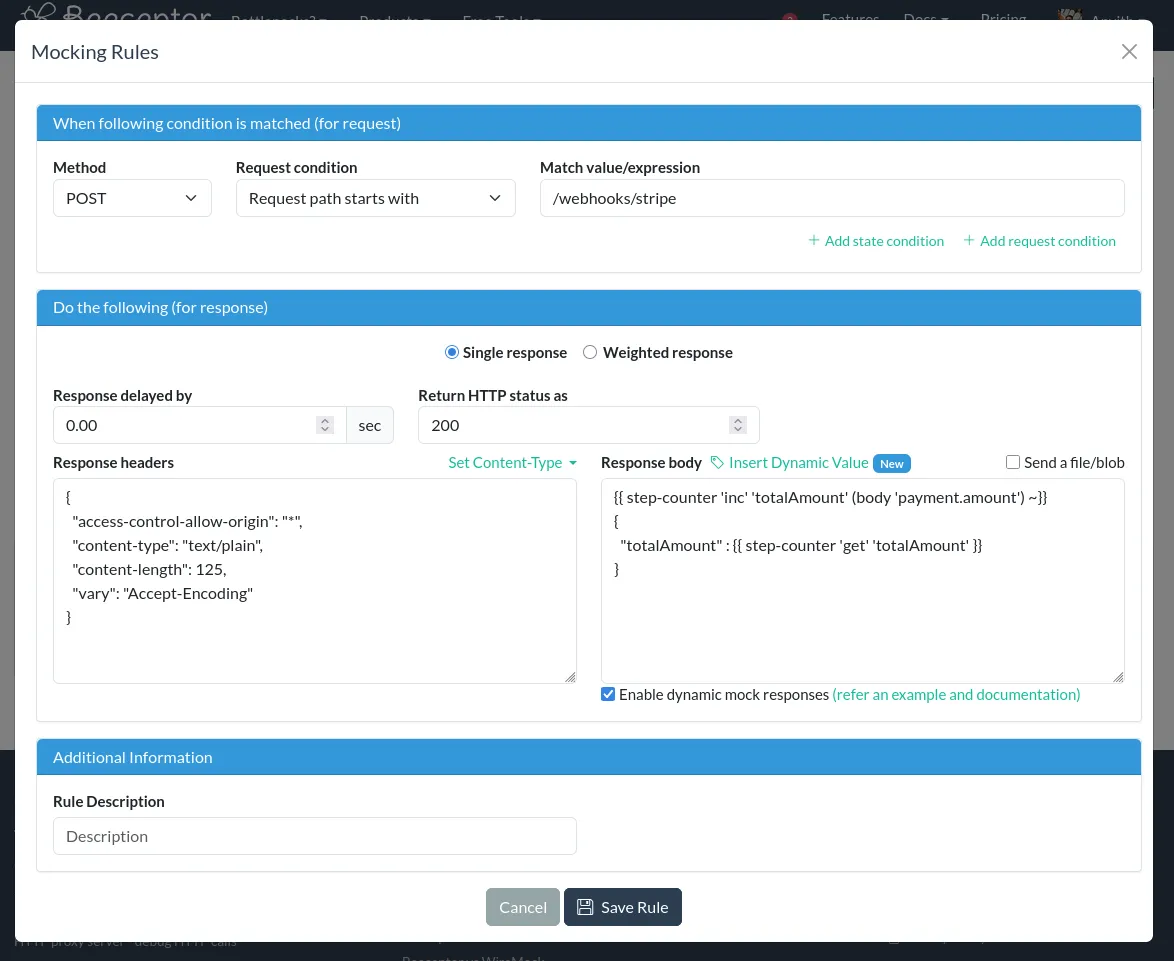
When the request fires, Beeceptor stores and increments the totalAmount variable with the random payment.amount from the request body.
3. Response Manipulation (Simulating Failures)
You can write a Beeceptor rule to simulate failure conditions, which is crucial for testing retry logic in your webhook producer.
For the “Ecomm Payload” (/api/v1/orders), create a rule to:
- Assign a Status Code
400(Bad Request). - Add a delay of 5 seconds.
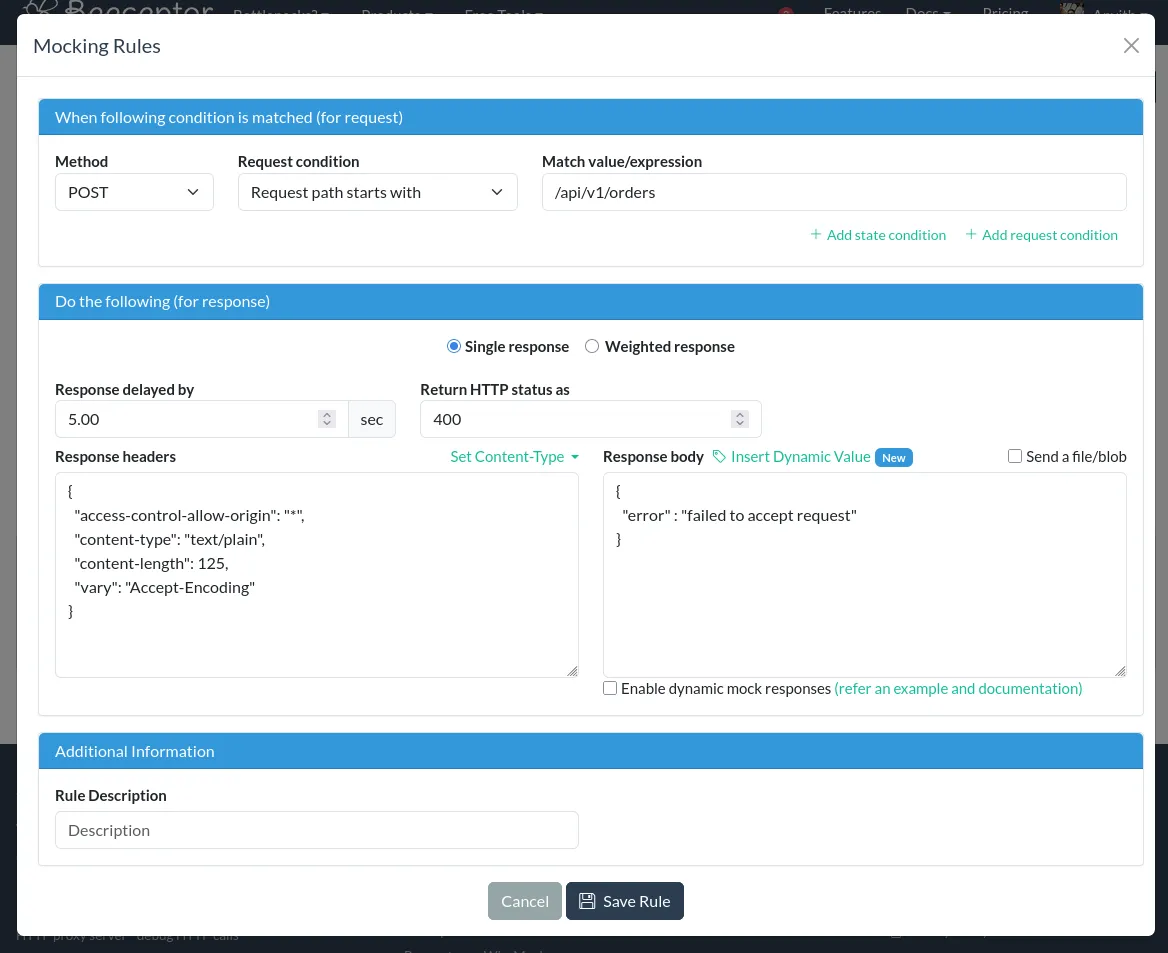
When the E-commerce scenario is run, Artillery will receive the delayed 400 status code for each request, reflecting a real-world error scenario.
4. Request Filtering by Payload Content
Beeceptor’s Request Conditions (matching) enable you to filter and act upon only specific requests.
To filter the /webhooks/stripe requests and only process those where the payment status is "succeeded", add a request condition:
- Type: “Request body matches a regular expression”
- Regex:
"payment"\s*:\s*\{\s*[^}]*"status"\s*:\s*"succeeded"
Set the response body for this filtered request:
{
  "message": "payload contains success value"
}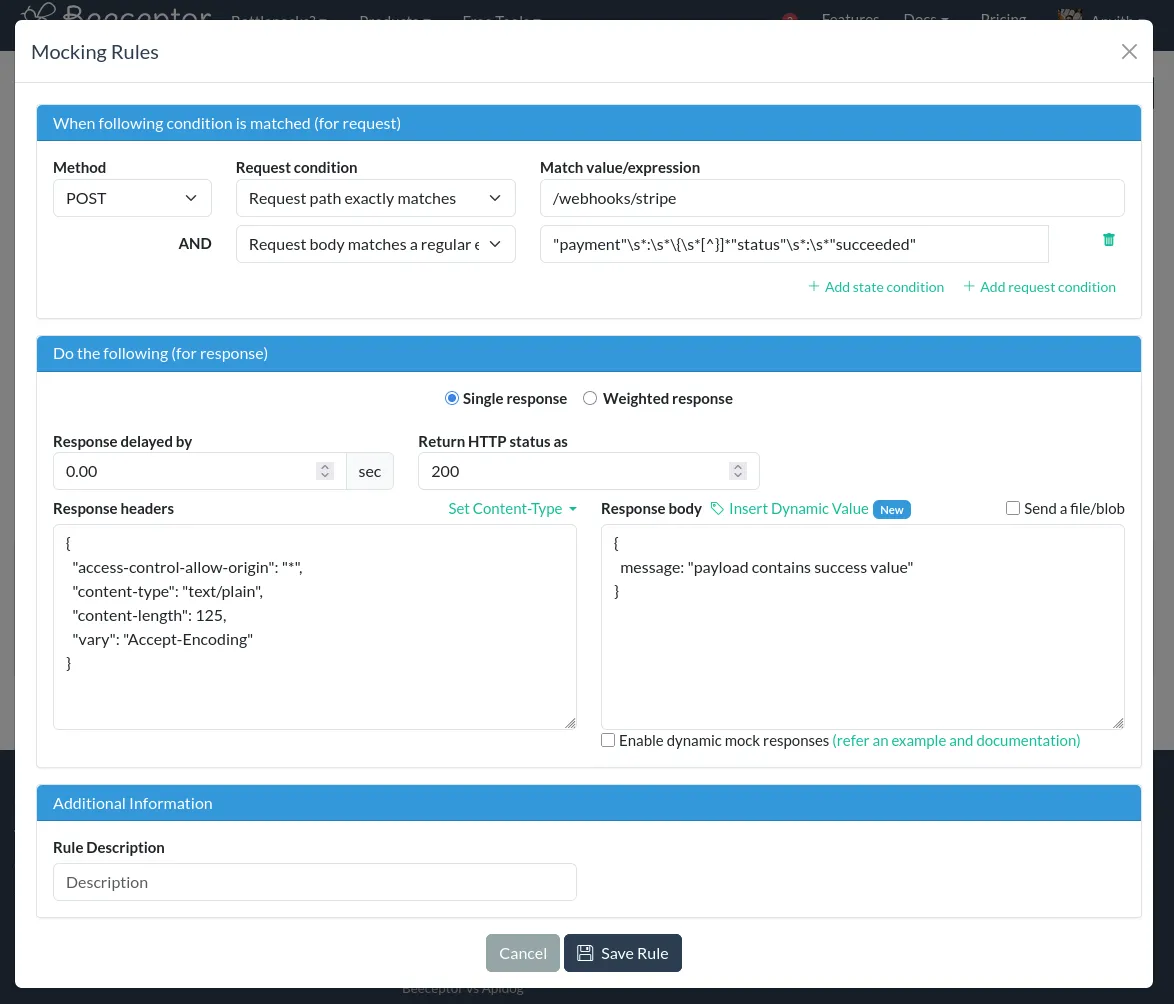
This response will only be triggered when the request body contains payment.status as "succeeded".
5. Forwarding and Transforming Payloads (Callouts)
Beeceptor can forward a received payload to a secondary sink (another endpoint) after optionally modifying it.
- Target Sink: Use an example production endpoint, e.g.,
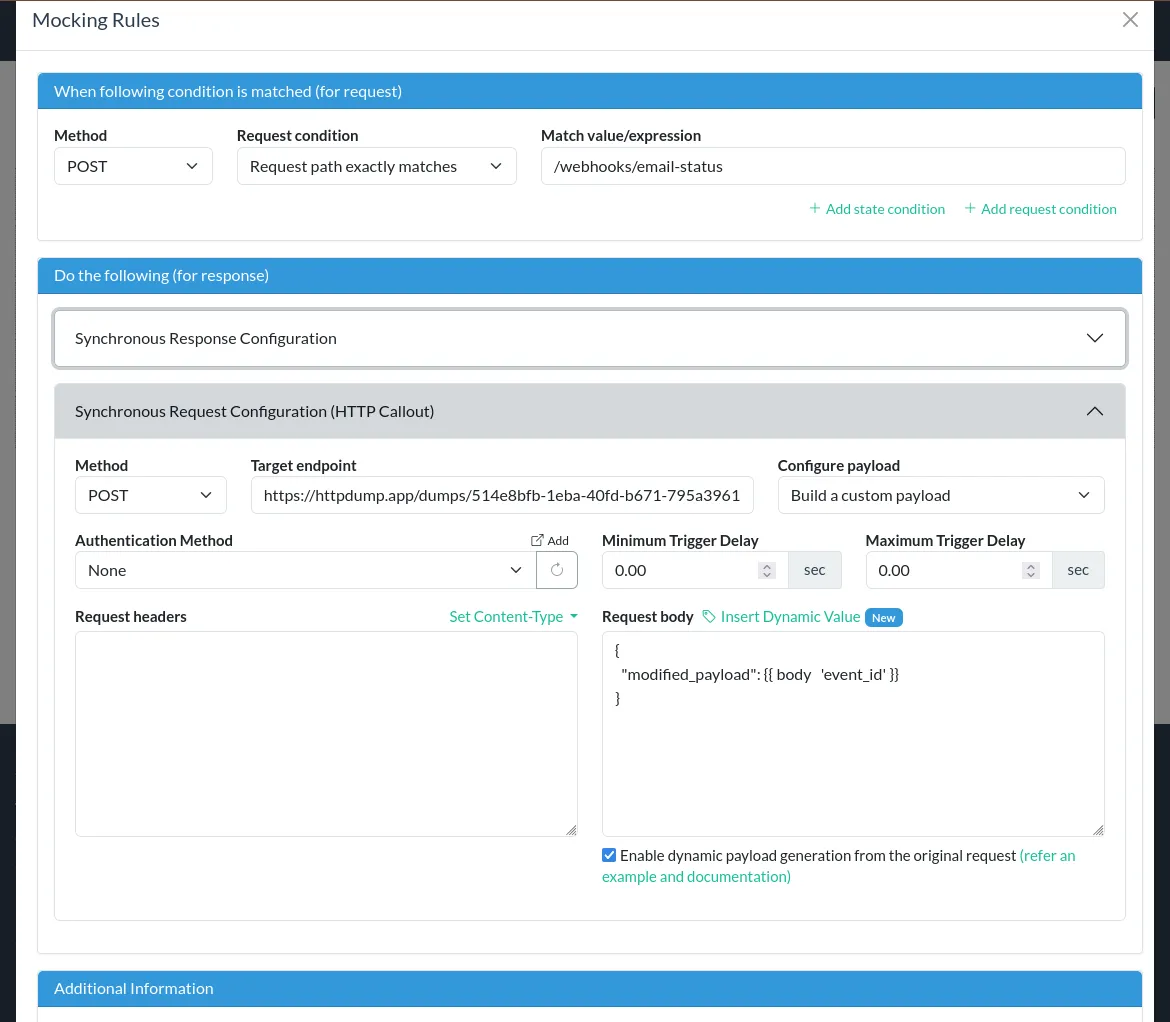
https://webhooks.your-service/com. - Rule Setup: Create a new Callout/Proxy Rule for the “Email Payload” scenario (Method: POST, Path:
/webhooks/email-status). - Configuration: Under “Synchronous Request Configuration (HTTP Callout)”:
- Set Method to POST.
- Set the target endpoint. We’ll use httpdump as an exaple to demonstrate the payload actually being forwarded.
- Select “Build a custom payload” and use this template:
{
  "modified_payload": {{ body 'event_id' }}
}
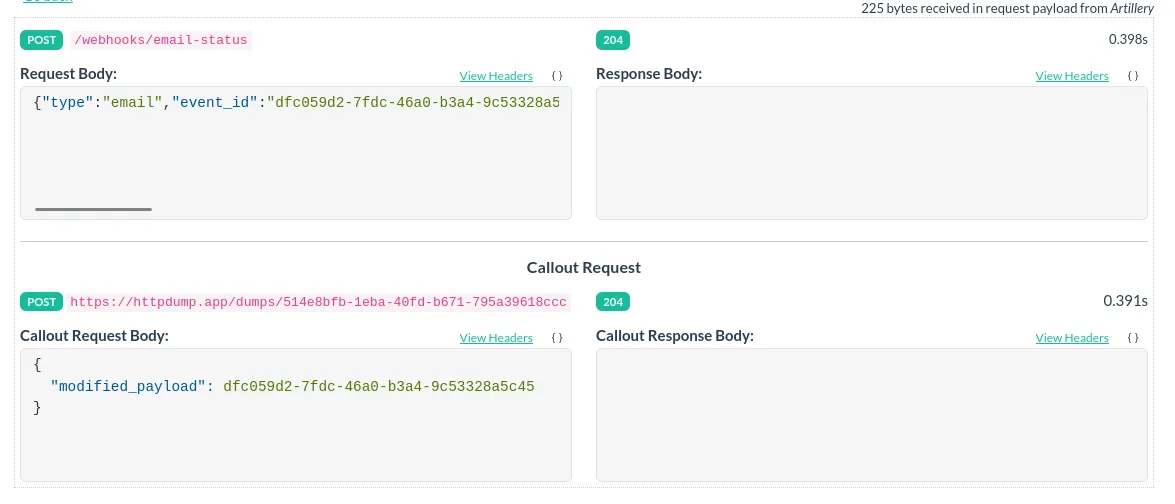
When the “Email Payload” scenario is run, the Beeceptor dashboard will show a callout log. This log confirms that Beeceptor received the original request, created the custom payload (which only contains the event_id), and forwarded it to the secondary target sink. We’ll click on this icon to check the callout log:
You will notice two rows, the first row being the request from Artillery and the second being the callout request from our Beeceptor mock server. This mock server receives a request from Artillery, and then creates a custom payload based on the request body sent from Artillery and sends it to the target.
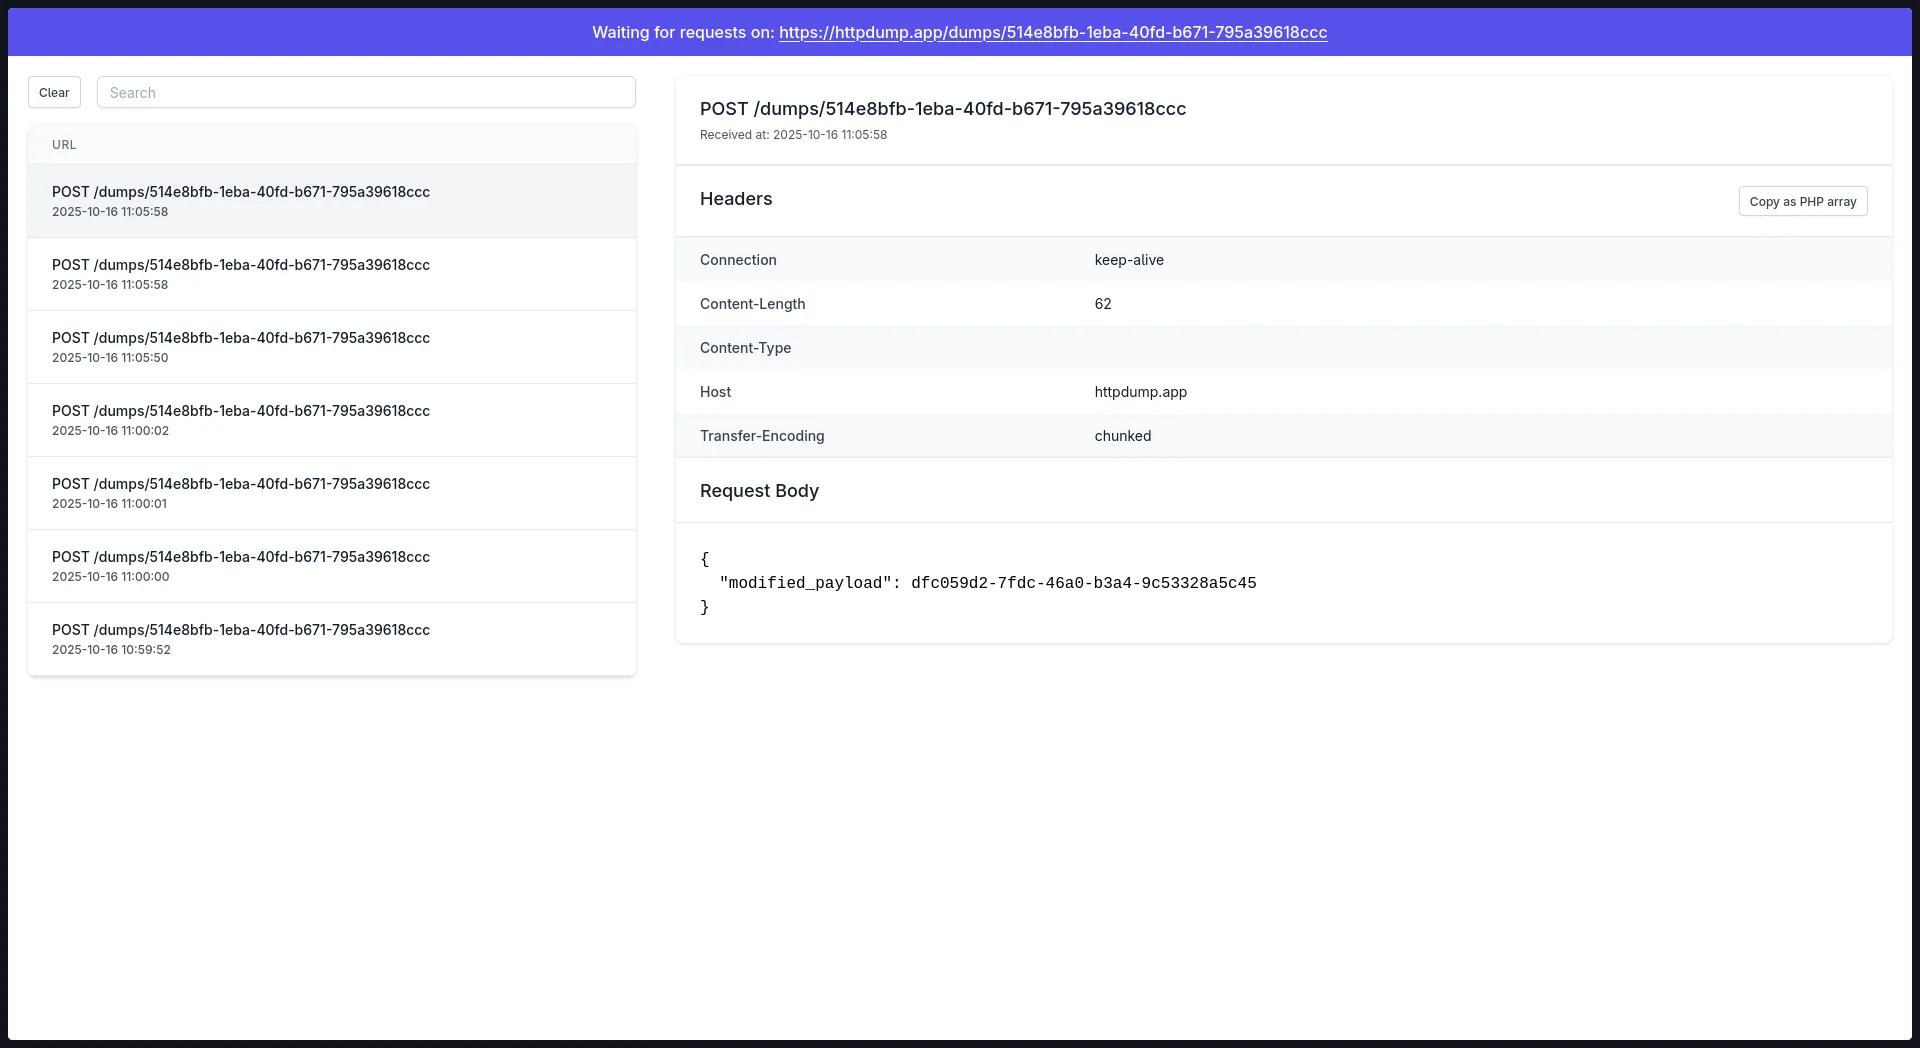
Also, on httpdump:
6. Local Tunneling
We can forward values from Beeceptor to our system by local tunneling. This requires obtaining beeceptor-cli.
You can obtain your OS-native binary for beeceptor-cli, or install it using npm.
Once you have it installed, run the beeceptor-cli: beeceptor-cli -p [port_number] or npx beeceptor-cli -p [port_number] (if installed using npm). Now, if you write a rule to the mock server locally tunneled using beeceptor-cli (free or authorized endpoints), you can launch Artillery CLI and see requests being fired into beeceptor, and then being sent via beeceptor-cli to your local machine.
Summary
This guide demonstrates how we can use Artillery CLI (using @ngneat/falso for realistic data) and Beeceptor as powerful and flexible solutions for advanced webhook integration and testing.
We covered key techniques for robust webhook system development:
- Payload Inspection: Viewing live, real-world traffic on the Beeceptor dashboard.
- State Management: Storing and updating stateful data (e.g., aggregating payment totals) using
step-counter. - Failure Simulation: Manipulating responses to return status codes (e.g.,
400) and adding delays to test resilience. - Targeted Filtering: Using regular expressions to trigger rules only for specific payload content (e.g., successful payments).
- Data Flow Control: Forwarding and transforming payloads to a secondary endpoint (callouts).
- Local Tunneling: Receiving webhooks locally using the beeceptor-cli to test local services without exposing them to the public internet.
This approach moves beyond basic testing, allowing developers to create a realistic, controlled environment to ensure their event-driven systems are reliable.